
This post may contain affiliate links: read full affiliate disclosure.
If you have ever thrown kitchen scraps or yard waste into the trash and thought, “What a waste,” you are not alone.
Store-bought compost bins can be pricey, tricky to set up, and may still attract pests if they are not designed well.
The good news is, you do not need an expensive setup to start composting at home.
With a few basic materials and clear steps, you can build a compost bin yourself that works, no bad smells, no pests, just rich, dark soil that your garden will love.
In this guide, I will show you exactly how to do it, step by step, so you can turn everyday waste into something useful.
Why Build Your Own Compost Bin?
Buying a compost bin might seem simple, but the that ones from the store can be very expensive and often create problems.
They might not have good airflow, which slows down composting, or they might let pests get inside. When you build your own bin, you are in charge.
You can choose the size, control the airflow, and create a design that works for your yard. A DIY bin also costs a lot less.
You can use materials like old pallets, wire mesh, or even a spare trash can.
Besides saving money, you will reduce your household waste, keep food scraps out of the landfill, and make rich compost to feed your plants.
A homemade compost bin is a smart, affordable choice that fits your exact needs.
Save this article for later

Step By Step Guide to Build a DIY Compost Bin
Images are sourced from Epic Gardening YouTube Channel to help my readers visualize these steps. You can check out their channel for more inspiration and detailed guides.
1. Pick the Right Spot
Do not put your compost bin in the middle of your garden, it will just get in the way. Pick the spot that is easy to reach but not in your daily path.
In this project, the bin was placed next to the chicken coop so that bedding could go straight in.
Leave a few inches of space between the bin and any walls or fences to stop moisture from getting trapped and causing wood to rot.

2. Cut Your Wood
Put on your safety glasses, it is time to cut the wood. Use 2×4 pieces for the vertical posts and 1×6 boards for the slats.
When you put the slats together, leave small gaps between them to let air flow through.
Airflow is important for composting. If you want to save money, you can use pallets instead of buying new wood.

3. Build the Side Panels
Each section of the bin needs a side wall. To make one, place the boards between two 2×4 posts and secure them with long cabinet screws.
This method makes the walls strong without splitting the wood. Once you finish one panel, repeat the steps until you have enough panels for all the sections.

4. Assemble the Panels
Now it is time to connect the side panels. Lay them out on a flat surface and fasten them together to begin building the frame for your compost system.
We designed this as a five-bay system, so make sure you keep the spacing even between each panel.

5. Build the Back Wall
Turn the frame over so you can work on the back. Place 1×6 boards across the back, cutting smaller pieces to fill any gaps.
Use a stronger 2×4 board at the bottom, as this part will touch the ground and needs to be more durable. After you finish, carefully stand the entire frame upright.

6. Add the Front Channels
Now you will build the front walls for each bay. Use 2x2s to create channels. These channels work like rails, allowing you to slide boards down to close the front of the bin.
To keep the channels straight, space them about one inch apart. A simple spacer board will help you maintain an even gap.
Clamp the pieces in place before you drill to make the job easier.

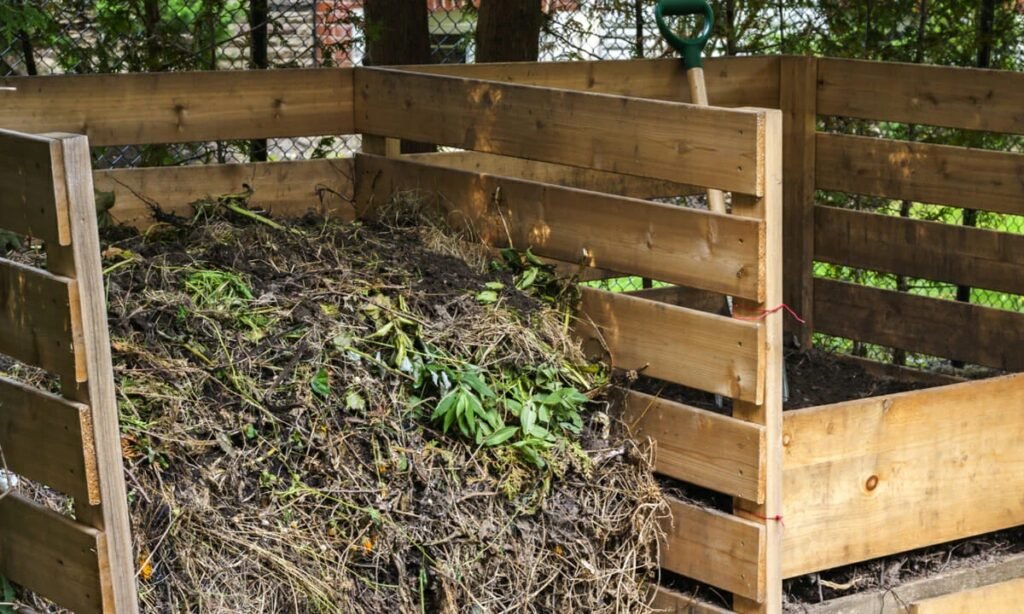
7. Fill and Start Composting
Your compost bin is now finished and ready to use. You can start by filling it with garden waste, kitchen scraps, or even the sawdust left over from this project.

How to Keep Pests and Smells Away
Unpleasant smells and unwanted pests are the main reasons people stop composting. You can fix this easily, just do not add meat, dairy, or oily foods to your pile.
Always cover your kitchen scraps with dry leaves or cardboard to keep smells down.
Make sure air can move through your pile by adding holes or turning it regularly; this prevents it from getting soggy and stinky.
If your compost feels too wet, mix in more dry materials like leaves or paper until it feels like a damp sponge you have squeezed out.
For more protection, you can put a strong wire mesh under ground-level bins and use a secure lid on can-style composters to keep animals out.
Taking these small steps will help you keep your compost clean and free of critters.
When Is Your Compost Ready to Use?
Figuring out when your compost is ready can keep you from adding unfinished scraps to your garden.
A finished batch should look and smell like rich, dark soil, not like old food waste. You should not be able to recognize things like eggshells, peels, or leaves because they have broken down.
The pile will also feel cool; compost that is still working gets hot, but finished compost stays at a normal temperature even after you mix it.
When you squeeze a handful, it should feel crumbly and damp, not slimy.
Most home compost bins are ready in about three months if you turn them often, or six to twelve months if you do not.
Once your compost looks the same throughout, smells like earth, and no longer heats up, it is ready to use on your plants.
Conclusion
Making your own compost bin can be very simple, effective and affordable.
You can use a few basic materials and a good setup to transform your kitchen scraps into valuable compost that enriches your soil and cuts down on waste.
The secret is finding the right balance: a good mix of green and brown materials, plenty of air circulation, and a way to keep pests out.
Once you learn the process, composting will feel natural. If you start small and keep at it, you will have free, healthy compost for your garden in just a few months.
FAQs
Can I build a compost bin if I have a small yard or balcony?
Yes. A simple trash can with holes drilled into it or a cylinder made of wire mesh will work perfectly in small spaces.
If you live in an apartment, you can even use a 5-gallon bucket with a lid.
Just make sure you keep the right balance of green and brown materials, and you will still get compost.
What should I do if my compost isn’t breaking down?
If your compost pile looks the same after several weeks, it usually means one of three things: it does not have enough green material, enough moisture, or enough air.
You can add fresh kitchen scraps for nitrogen, sprinkle some water until the pile feels like a damp sponge, and give it a good turn to mix everything together. This will help restart the process.
You may also like to read!
- How to Make Outdoor Candles at Home
- How to Make a Macrame Plant Hanger
- How to Make DIY Pegboard Tool Organizer

Hi, my name is Ali Mehmood! I’m a passionate writer and DIY enthusiast who loves turning creative ideas into practical, hands-on projects.
I created this website to share inspiring, budget-friendly ideas that you can do yourself – whether it’s organizing your home, crafting something unique, or creating fun projects for kids and pets.
I believe DIY isn’t just a hobby – it’s a smart way to save money, reduce waste, and enjoy the satisfaction of making things with your own hands.
I’m excited to have you as part of this growing community, and I’ll continue bringing you helpful, realistic, and fun DIY ideas you can actually use.


