
This post may contain affiliate links: read full affiliate disclosure.
Buying outdoor candles often feels like wasting money.
They burn out quickly, struggle in the wind, and the so-called “bug-repellent” ones rarely work as promised.
On top of that, they usually do not match your style or outdoor space. The good news is, you do not have to settle for store-bought candles.
With a few basic supplies, you can make outdoor candles at home that last longer, look better, and meet your needs.
How Can You Get Creative With Outdoor Candle Ideas?
Homemade candles do not have to be plain jars. With some creativity, you can match them to your outdoor space and turn them into décor.
For a rustic patio, use recycled tin cans. Punch small holes around the sides before pouring in the wax, and they will create a lantern-like glow when lit.
For a dining table centerpiece, pour wax into wide ceramic bowls and add two or three wicks.
These will light up the table and make a bold statement. If you want an eco-friendly option, reuse old mugs or thrifted glassware.
They are heat-safe, unique, and add a personal touch to your candles. Another fun idea is floating candles.
Make small wax discs using molds, then place them in bowls of water for a magical garden effect. These creative ideas make your candles both useful and stylish.
Save this article for later

What You Need to Make Outdoor Candles
- Heat-safe outdoor containers (heavy glass jars or metal tins)
- Pre-tabbed candle wicks (size will depend on jar diameter)
- Wick stickers or high-temp hot glue
- Wax (soy, paraffin, blends—your choice)
- Pouring pitcher + pot (for a double boiler)
- Thermometer (follow your wax supplier’s temps)
- Fragrance oil made for candles (citronella or outdoor blends optional)
- Candle dye (optional, candle-safe only)
- Stir stick/spatula
- Wick holders/centering clips (clothes pin or popsicle stick also works)
- Scissors or wick trimmer
Step By Step Guide to Make Outdoor Candles at Home
Images are sourced from Wade (BLACK TIE BARN) YouTube Channel to help my readers visualize these steps. You can check out their channel for more inspiration and detailed guides.
1. Pick your jar and set the wick
Pick a strong jar or tin that is safe for outdoor use. You can attach the wick to the center with some wick sticker or a small drop of hot glue to keep it steady.

2. Melt the wax
You can figure out how much wax you will need and melt it in a pouring pitcher. Use a double boiler by placing the pitcher in a pot of hot water. Heat it slowly until the wax turns completely liquid.

3. Add candle dye (optional)
If you want to add color, stir in a candle-safe dye while the wax is still hot. If you prefer a natural look, you can skip this step.

4. Stir in fragrance oil
You pour in fragrance oil that is made specifically for candles. Stir gently and thoroughly to make sure the scent spreads evenly through the wax.

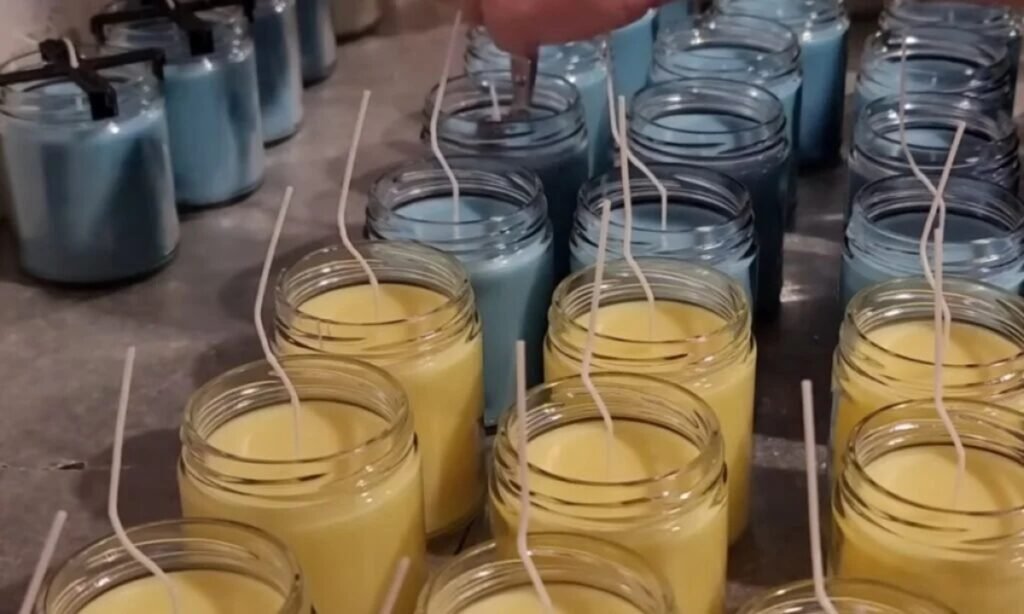
5. Pour into jars
Once the wax reaches the right temperature for pouring, carefully pour it into your jars. Go slowly to prevent bubbles from forming.

6. Keep wick centered
Use a wick holder, clip, or even a popsicle stick to keep the wick upright while the wax cools..

7. Let candles set
Leave the candles undisturbed for 24 to 48 hours. This allows the wax to harden evenly and the scent to fully develop.

8. Trim and enjoy
Cut the wick to about one-quarter inch before lighting the candle. Test it indoors first, then take it outside and enjoy your handmade creation.

Best Wax Choices for Outdoor Conditions
The type of wax you use can make or break your outdoor candles. Soy wax is a familiar choice because it burns cleanly and lasts longer.
However, in hot weather, regular soy wax can soften or lose its shape. If you live in a warm area, go for a soy-paraffin blend or a high-melt soy wax designed for heat resistance.
Paraffin wax is a budget-friendly option that holds fragrance well and burns brightly, but it can produce more smoke if the wick is too large.
The key is to match the wax to your outdoor setup: use soy wax for mild weather, blends for hot climates, and beeswax for premium, long-lasting candles.
Safety Rules You Should Follow
Never leave outdoor candles burning without someone watching them. Put them on a flat surface that will not melt or burn, and keep them away from plants or fabric that can catch fire.
Use only strong containers made for candles. Trim the wick to ¼ inch before you light it – this stops smoke and keeps flames from getting too big.
If you use citronella candles, keep them where pets cannot reach them because this scent can make animals sick.
Blow out the flame when only ½ inch of wax remains at the bottom to stop the container from getting too hot.
How Do You Troubleshoot Common Candle Problems?
Your outdoor candles will sometimes cause problems, even when you do everything right. Most issues have simple fixes you can handle yourself.
When your wick sinks into the wax and will not stay lit, you probably chose a wick that is too small for your container. Pick a bigger wick next time, or add a second wick if you have a wide jar.
When you see tunneling – a deep hole down the middle with unused wax stuck to the sides – you did not burn the candle long enough the first time.
Conclusion
Making outdoor candles at home is simpler than most people realize, and the results beat anything you will find in stores.
With the right wax, a good wick, and a safe container, you can make candles that burn longer, look better, and actually suit your outdoor space.
Add scents if you want them, style the candles to match your setup, and enjoy evenings lit by something you created yourself. Once you try it, you will never buy store-made outdoor candles again.
FAQs
How can I make my outdoor candles last longer?
Pick a larger or double wick for wide jars, cut it to ¼ inch before you light it each time, and make sure the first burn melts wax all the way to the edges.
Pick a wax blend that melts at higher temperatures to help your candles survive hot summer weather.
Can I reuse old candle wax to make new outdoor candles?
Yes, you can. Gather your leftover wax, melt it down, and pour it into a clean container with a new wick.
Just do not mix too many different wax types together, because they might not burn the same way.
You may also like to read!
- How to Make a Macrame Plant Hanger
- How to Make DIY Recessed Shelving Between Studs
- How to Make a DIY Wire Pumpkin Wreath the Easy Way

Hi, my name is Ali Mehmood! I’m a passionate writer and DIY enthusiast who loves turning creative ideas into practical, hands-on projects.
I created this website to share inspiring, budget-friendly ideas that you can do yourself – whether it’s organizing your home, crafting something unique, or creating fun projects for kids and pets.
I believe DIY isn’t just a hobby – it’s a smart way to save money, reduce waste, and enjoy the satisfaction of making things with your own hands.
I’m excited to have you as part of this growing community, and I’ll continue bringing you helpful, realistic, and fun DIY ideas you can actually use.


