
This post may contain affiliate links: read full affiliate disclosure.
Planting feels exciting until everything starts to sprout and you suddenly cannot remember what went where.
Tomato, pepper, herb, and flower seedlings can look almost the same in the beginning, and one faded label can turn a neat garden bed into a guessing game.
Regular markers can disappear in the sun, wooden sticks can rot after watering, and some cute labels look nice for a few days but fail when real outdoor weather hits.
The best ones help you stay organized, keep plant names easy to read, and make your garden feel more cared for without spending much money.
Whether you have seed trays, herb pots, raised beds, flower borders, or a small backyard garden, the right label can save you from confusion later.
In this article, I am going to share DIY garden label ideas that look creative, feel budget-friendly, and actually make your garden easier to manage.
Lets dive in!
Simple Seed Markers
Plain white tags work best when you have many small pots and need a clean way to track every seedling without confusion later in spring.
Write the plant name and sowing date with a garden marker, then place each tag near the back edge of the pot for clear reading.
This style suits cuttings, divided plants, nursery trays, and new starts because the label stays simple while the plant does the talking beside it outside.
Bold Herb Signs
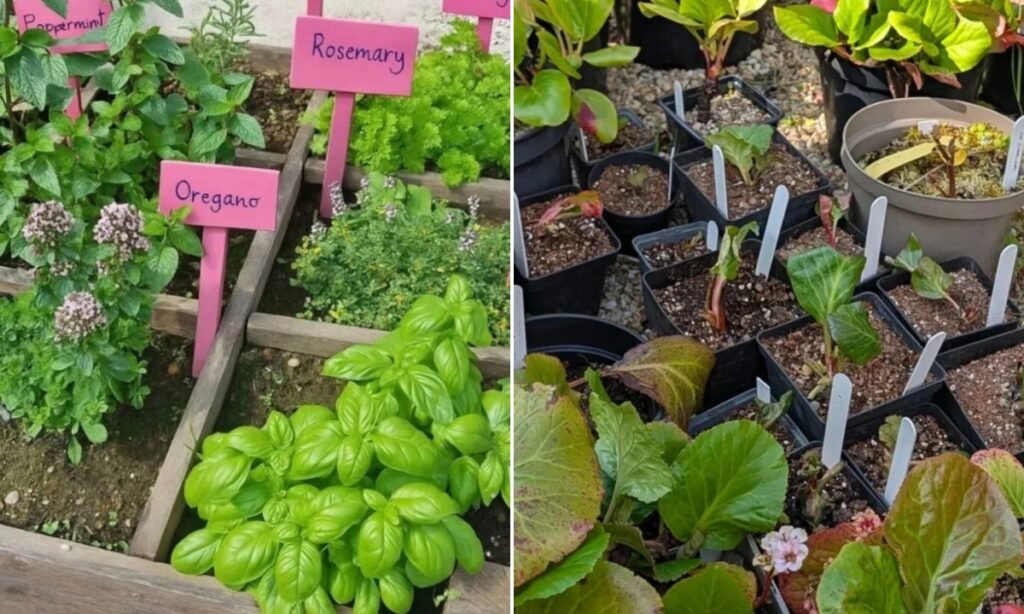
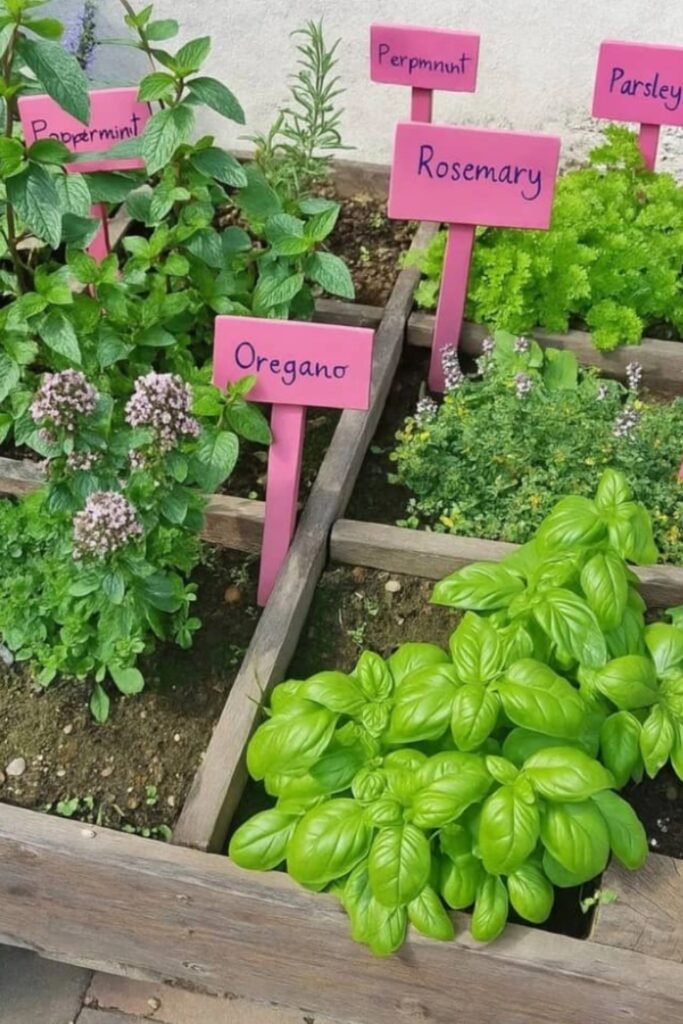
Large pink herb signs solve the distance problem when basil, rosemary, mint, and parsley grow full enough to hide tiny markers inside crowded beds fast.
Use this idea in raised herb boxes where you want names to feel clear, cheerful, and easy to spot from the walkway before harvesting leaves.
Paint the boards before you write on them, so the color looks intentional and the lettering stays readable against all that greenery through the season.
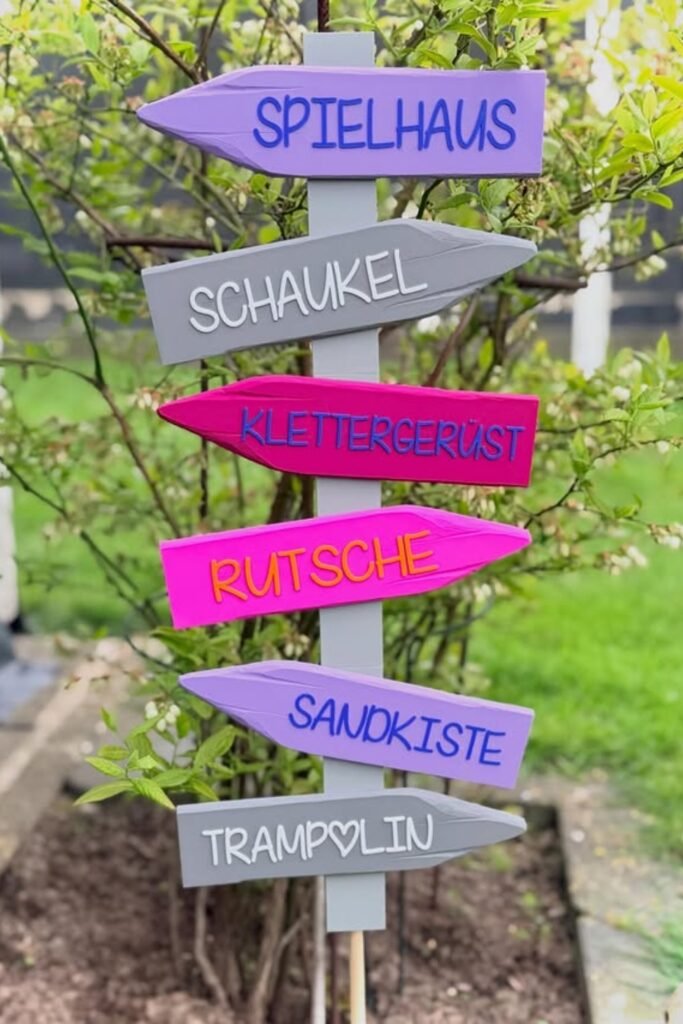
Playful Direction Signs
Not every garden label has to name a plant; some signs can guide people toward play zones, paths, or special backyard corners with personality too.
This arrow design works beautifully when your garden has a kids’ area, seating spot, compost corner, or little outdoor activity space near the lawn too.
Choose playful colors for each direction, then keep the words big and simple so the sign feels fun instead of cluttered from a distance away.
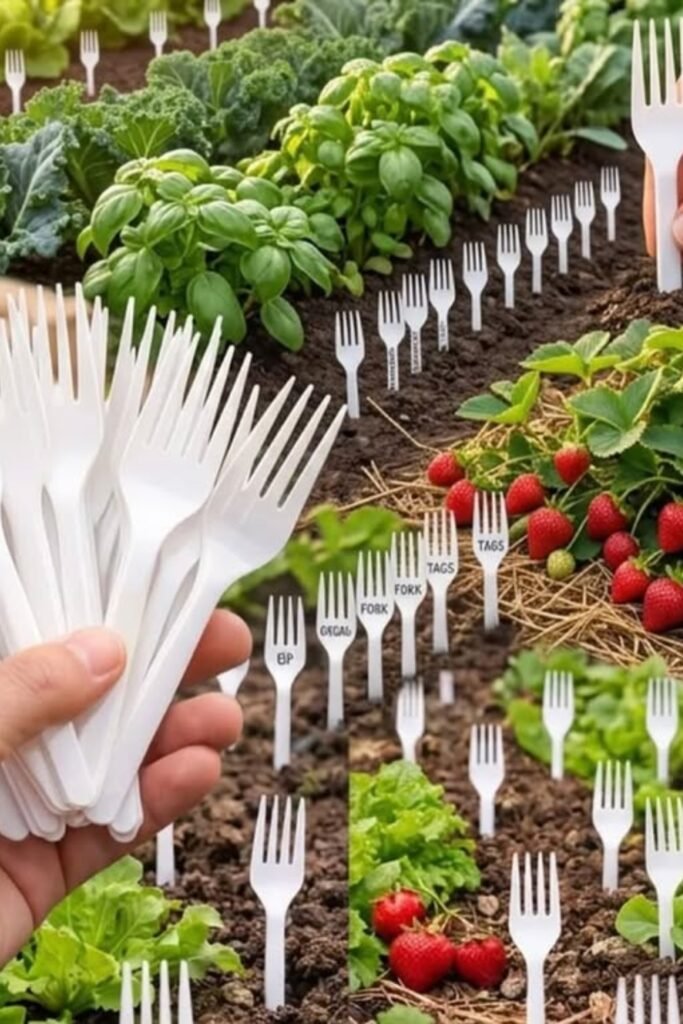
Fork Plant Tags
Plastic forks become easy garden tags when you need quick markers for rows, starter beds, or a large batch of seedlings on a budget.
Push the handle deep enough into loose soil, then write the plant name across the neck where it stays visible above young leaves easily outside.
This is better for short-term plant labels, especially if you need something cheap before you switch to stronger outdoor markers later in the season again.
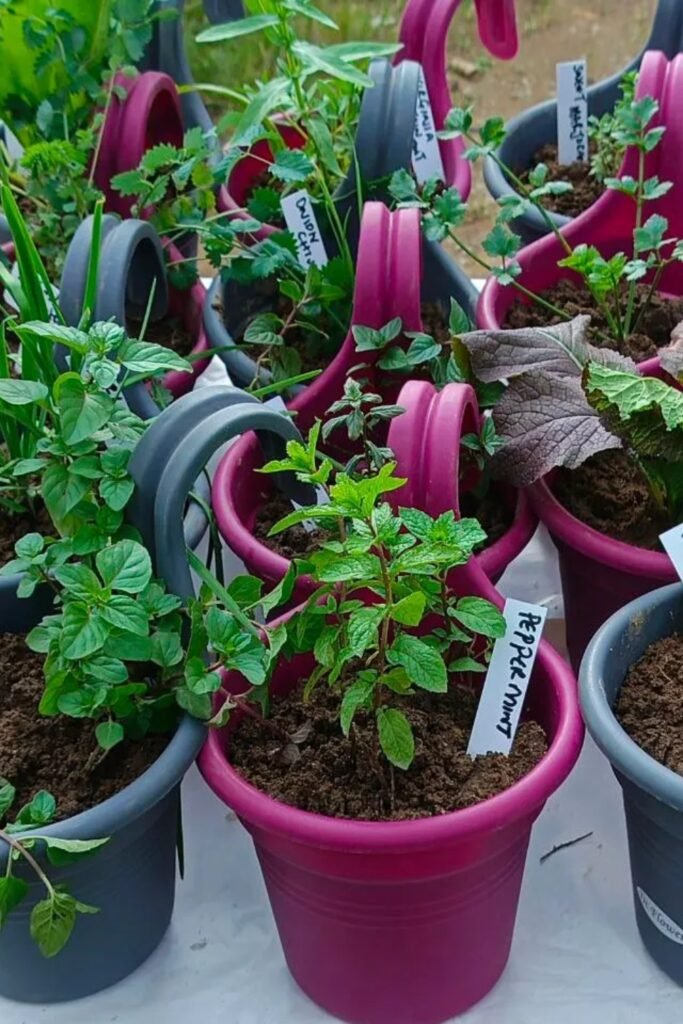
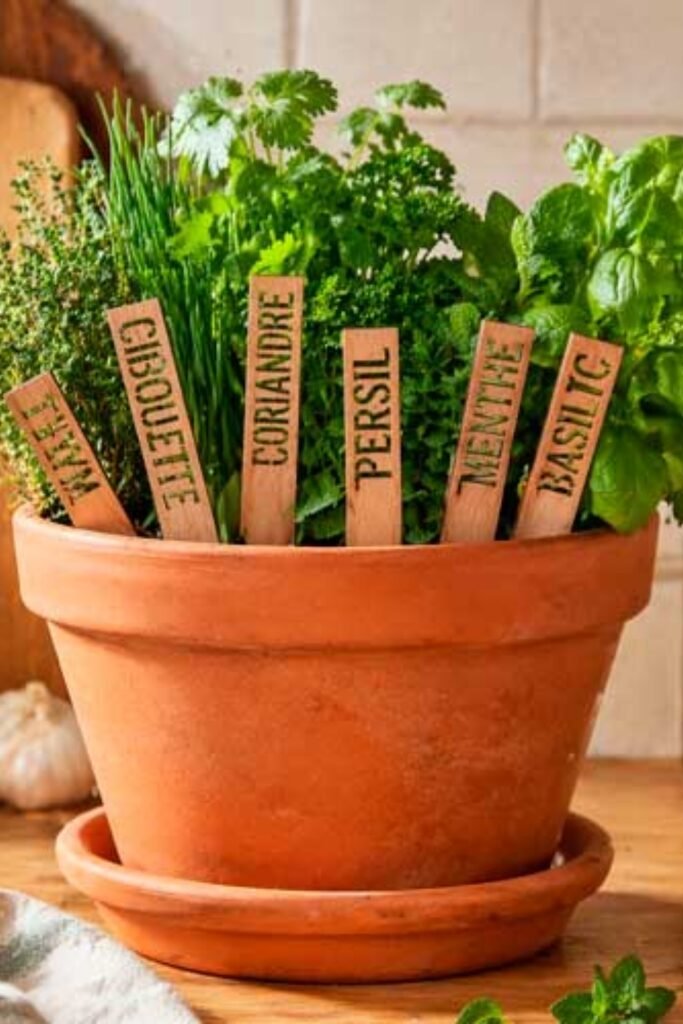
Potted Herb Tags
Grouped herb pots can get confusing fast, especially when mint, oregano, rosemary, and thyme all sit close together on the same table outside.
Simple white tags help you name each pot clearly without making the container garden feel busy, heavy, or too decorated for daily use.
Place the label near the rim instead of the center, so the plant has room to spread while the name stays easy to see.
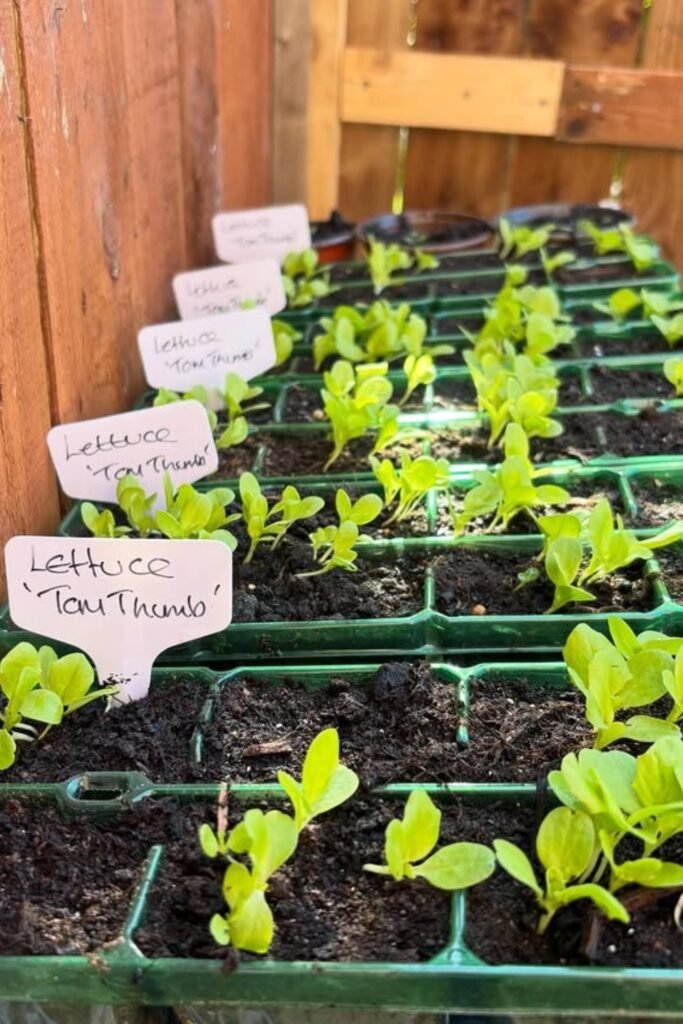
Seed Tray Labels
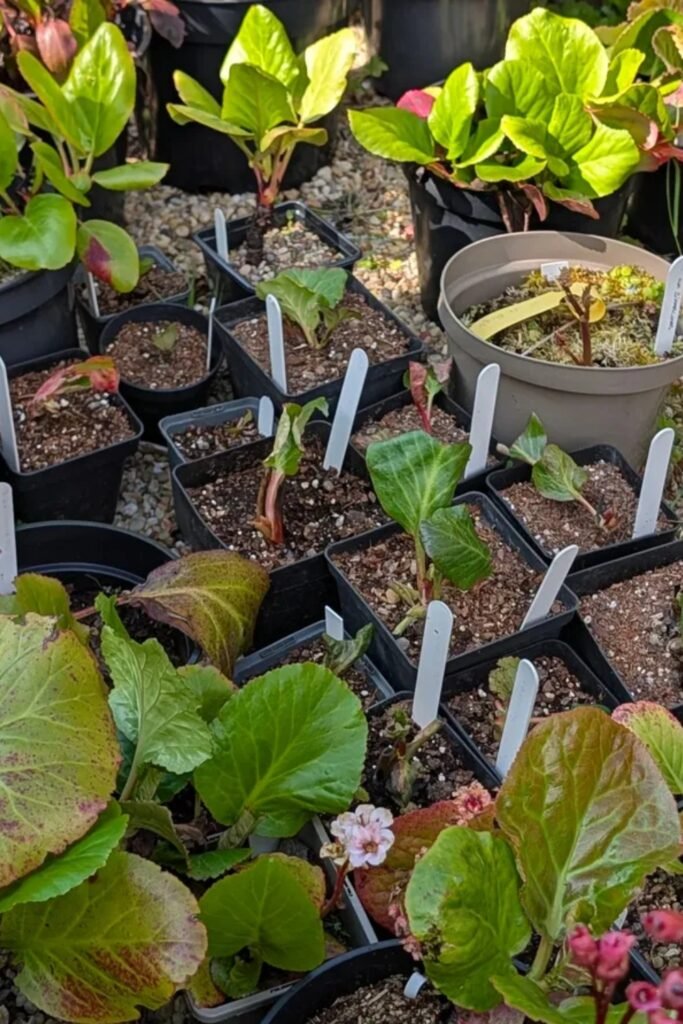
Seed trays need labels more than almost any garden setup because tiny sprouts can look nearly identical during the first few weeks of growth.
Use wider tags for trays, so you have space to write the variety name, planting date, or small note about the seed packet.
This works especially well for lettuce, herbs, flowers, and vegetables because every cell stays organized before you move seedlings into bigger pots.
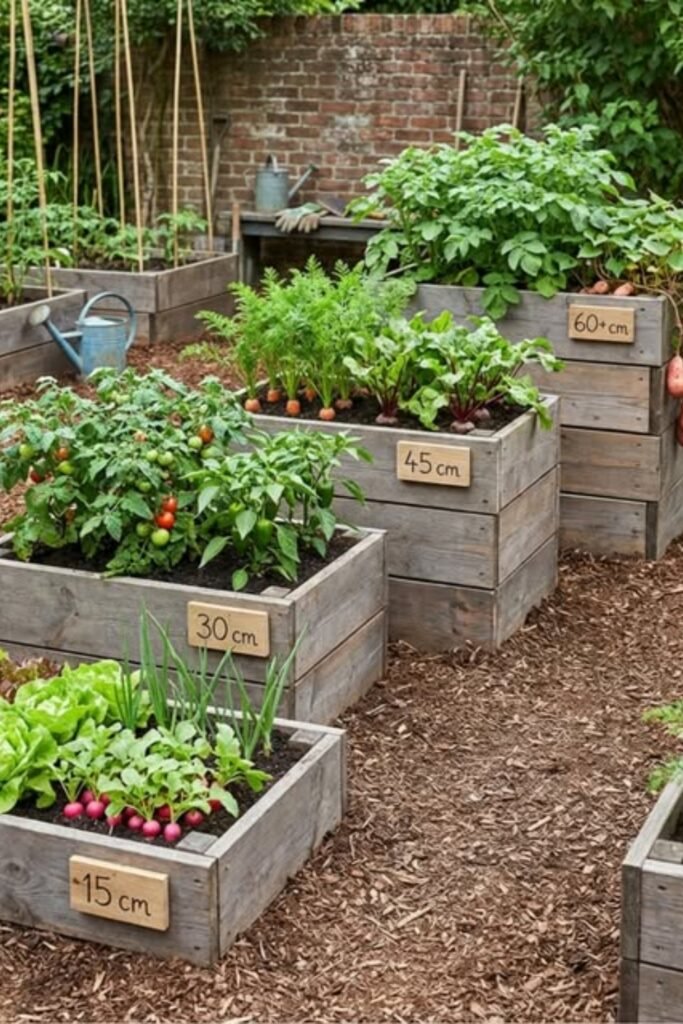
Raised Bed Signs
Raised beds feel much easier to plan when you label sections by spacing, height, or crop needs instead of only writing plant names.
These wooden signs work well for vegetable beds because they help you remember which plants need more room as they mature through the season.
Attach the signs to the bed front, so they stay visible from the path and do not get buried under leaves or mulch.
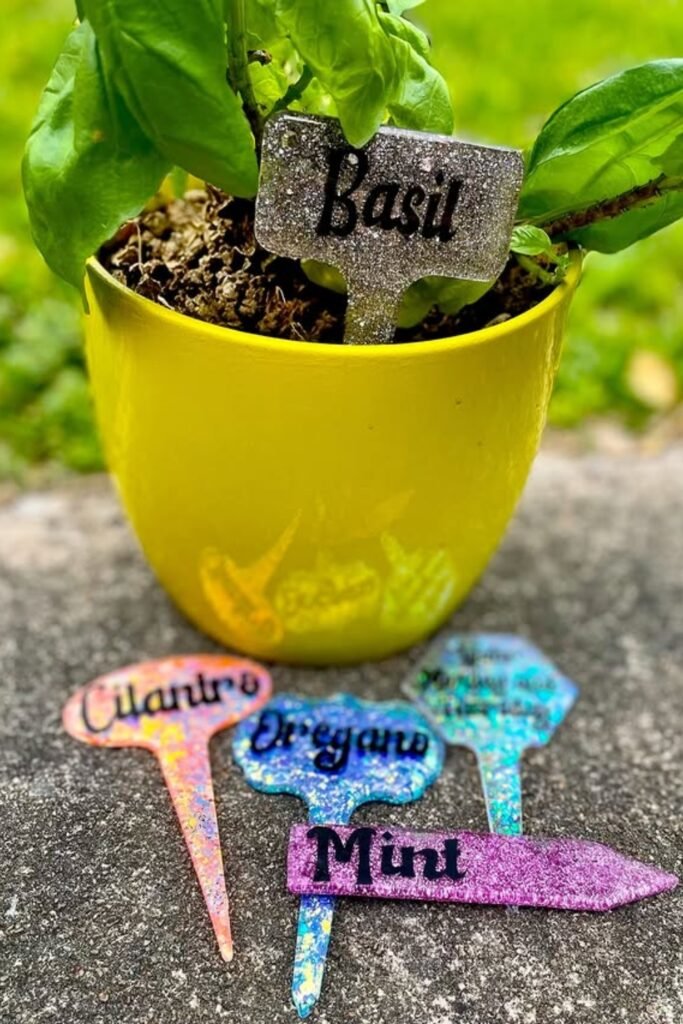
Glitter Herb Labels
A bold label can make small herb pots feel more personal, especially when the garden sits on a patio, balcony, or sunny kitchen step.
Use glitter paint or bright color only if you seal the surface, because rain and watering can quickly ruin decorative craft finishes outside.
This idea suits basil, mint, cilantro, and oregano when you want plant markers that feel playful but still help you grab herbs quickly.
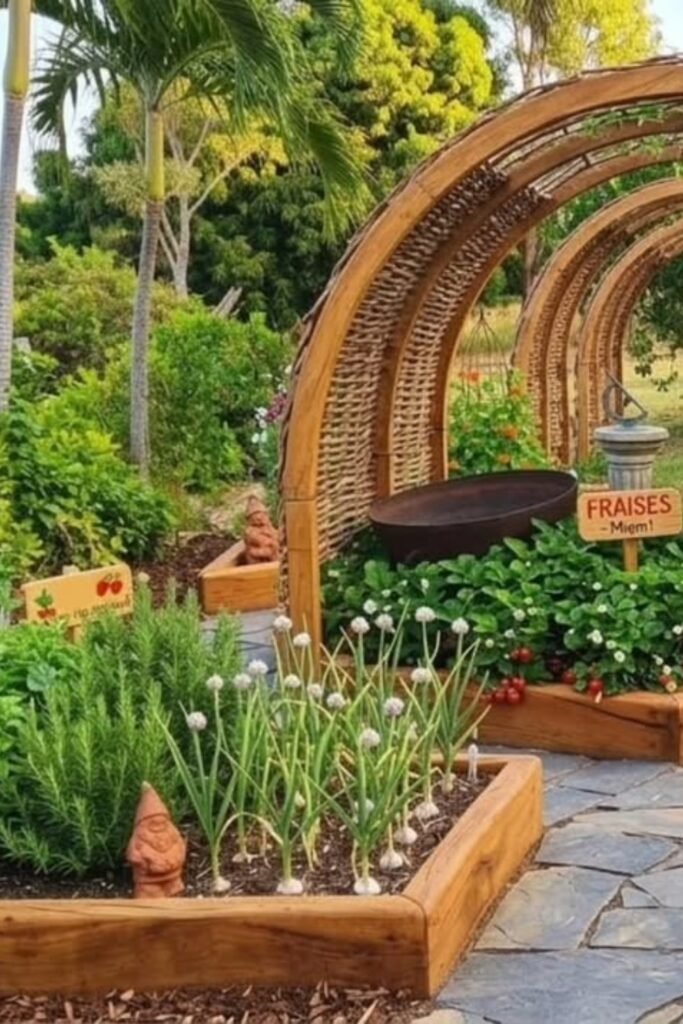
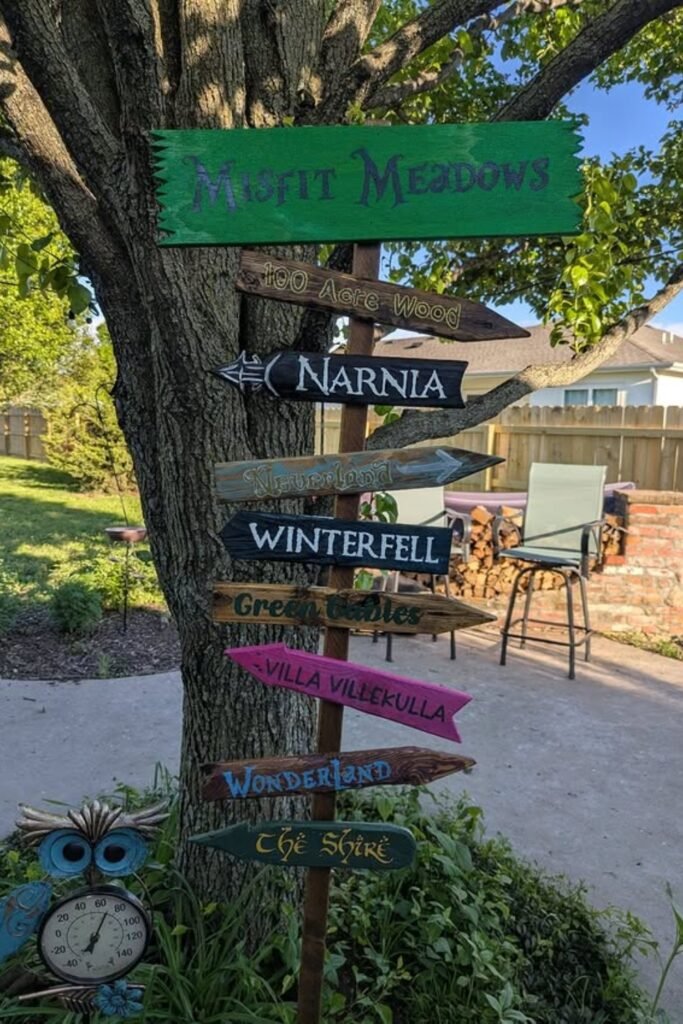
Storybook Garden Signs
Large wooden signs work beautifully when your garden has wide beds, paths, and different crops that need clear names from several steps away.
This style turns labels into part of the garden design, so basil, garlic, strawberries, and berries feel organized instead of randomly planted.
Use simple words and strong contrast on each board, because bigger garden signs should guide the eye without fighting the plants around them.
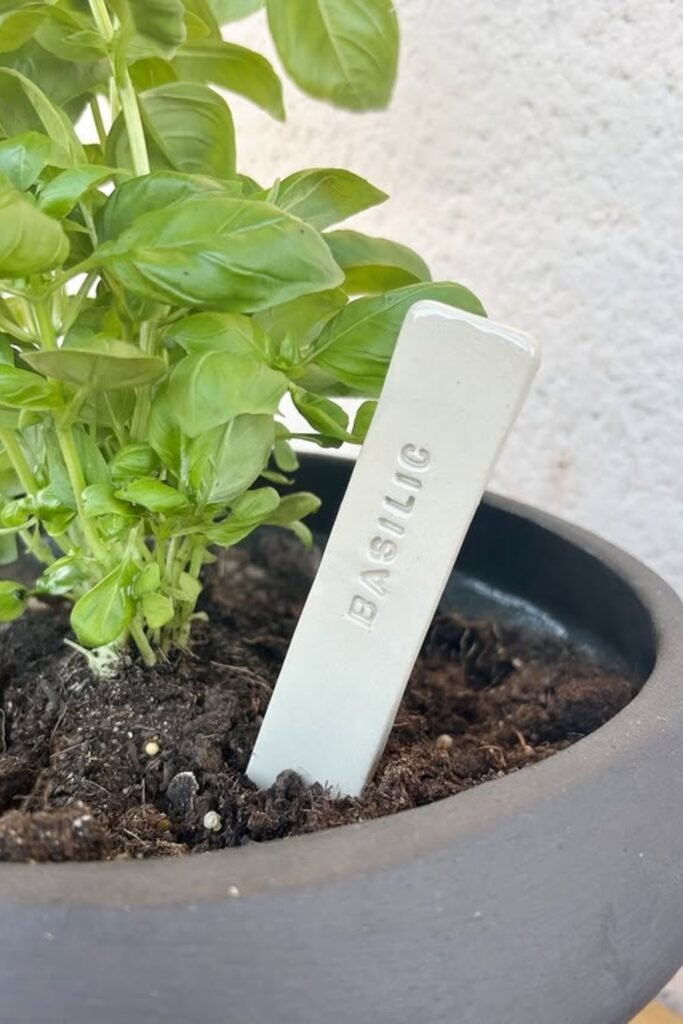
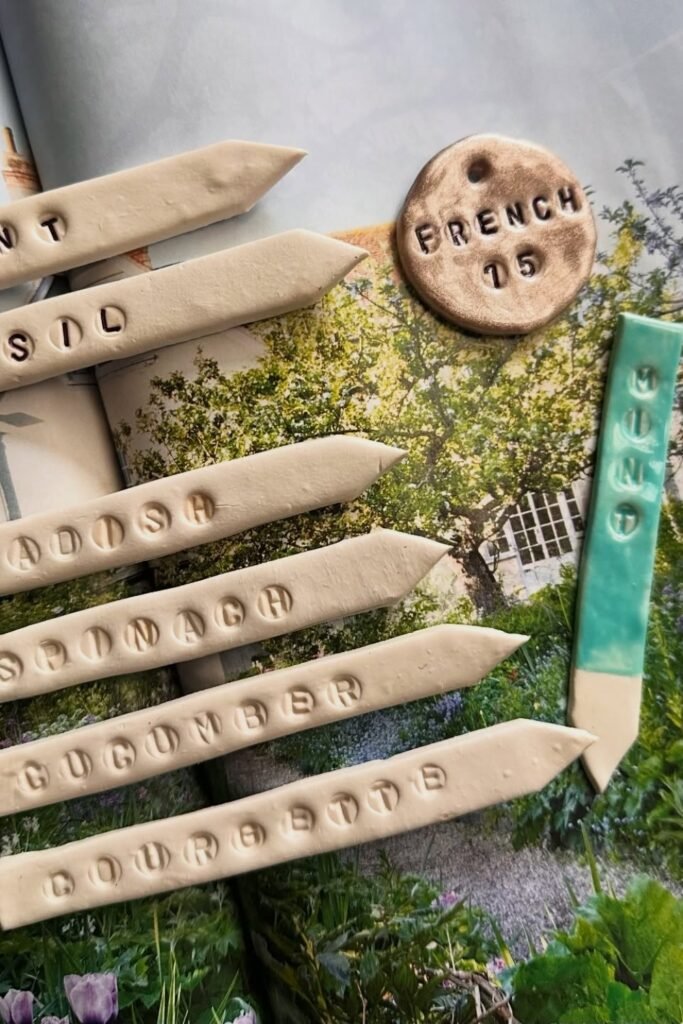
Stamped Clay Label
Stamped labels are perfect when you want something cleaner than handwriting, especially for herbs you grow often, like basil, mint, or thyme.
Clay or ceramic markers feel simple, but the raised letters give them a more finished look that suits patio pots and small kitchen gardens.
Push the label deep enough into the soil, so it stays steady while the plant grows full around the edge of the pot.
Herb Stick Labels
Wooden stick labels make a kitchen herb pot feel warm and useful, especially when several herbs grow together in one large container.
Write each herb name vertically to save space, then place the sticks behind the plants so the greenery still feels full and natural.
This idea works best for indoor herbs or covered patios, because untreated wood can fade or stain faster in heavy rain outside.
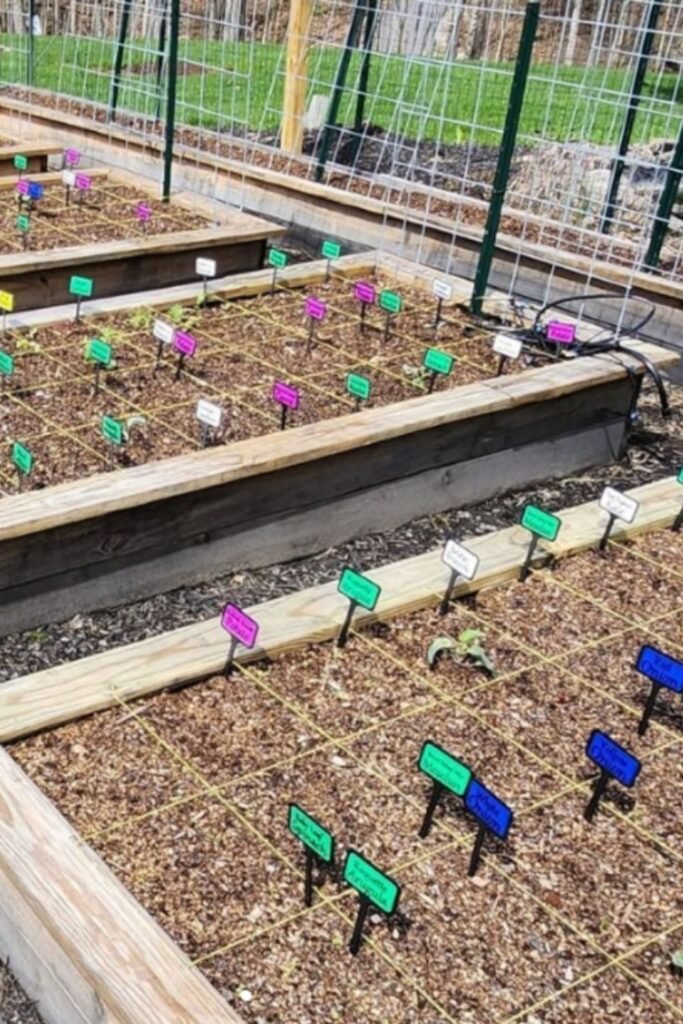
Grid Garden Markers
Raised beds with planting grids need clear labels, especially when you grow many vegetables from seed and each square holds something different.
Small colored markers help you track varieties without stepping into the bed or disturbing young seedlings while you check your garden plan.
Place each marker at the front of its square, so the label stays readable even after leaves spread and start covering the soil.
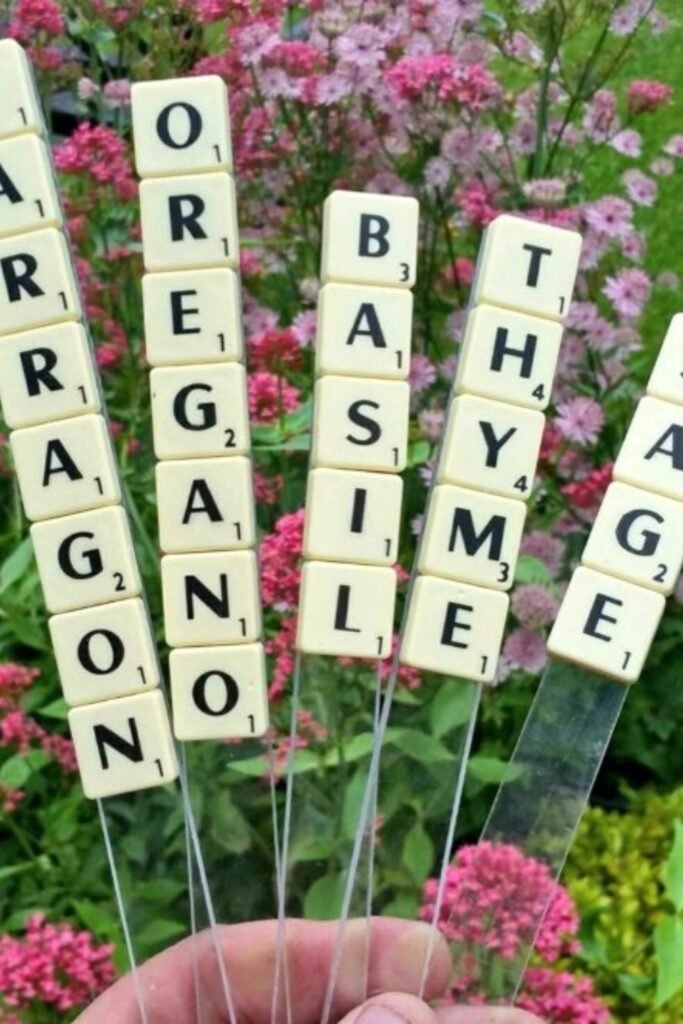
Tile Letter Labels
Scrabble-style tiles make plant labels feel playful, especially when you want herb names to stand tall instead of sitting low near the soil.
Attach each letter strip to a clear stake, so the word stays visible while flowers, herbs, or leafy plants grow around it.
This idea works best in decorative garden beds where labels can feel like part of the display, not only a practical plant marker.
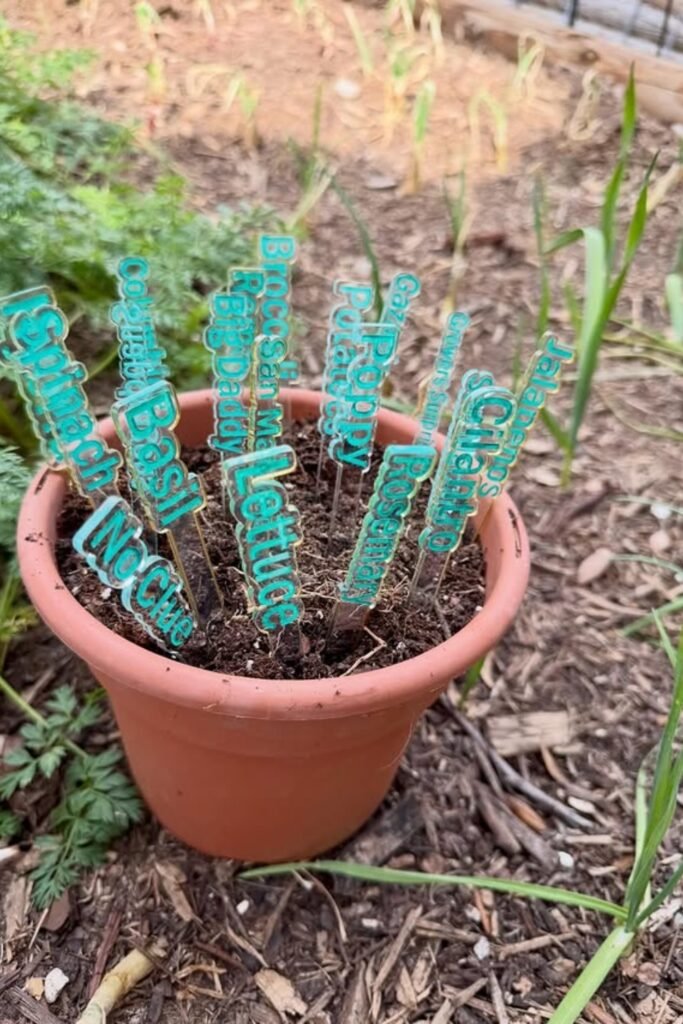
Acrylic Herb Picks
Clear acrylic labels are great when you want colorful plant names without covering the natural look of a small herb pot.
Use them for mixed herb containers where basil, cilantro, parsley, rosemary, and lettuce varieties can become hard to separate.
Because the letters sit above the soil, these markers stay easy to read even when the pot starts filling with fresh growth.
Stamped Clay Stakes
Stamped clay stakes give your garden labels a handmade look without relying on marker ink that may fade quickly outside.
Press the plant name into soft clay before drying, then use color only on the top if you want a more finished style.
These markers suit herbs, vegetables, and cottage-style beds because they feel simple, earthy, and practical beside natural garden textures.
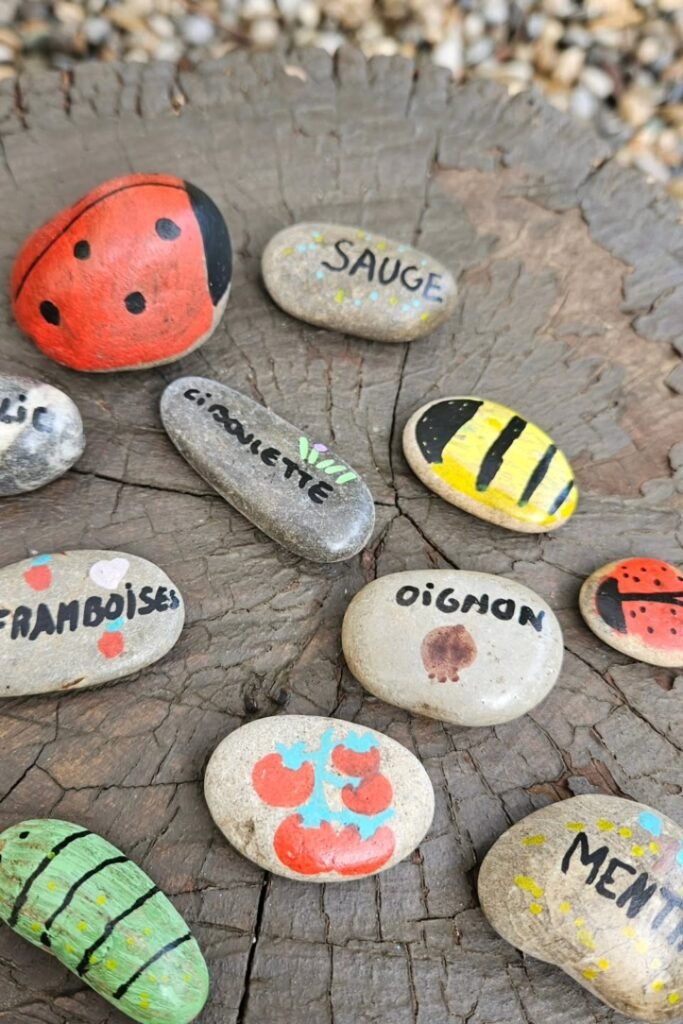
Painted Rock Labels
Smooth rocks work well when you want labels that sit low, stay in place, and do not blow away in open garden beds.
Paint the plant name clearly, then add small fruit, herb, or insect designs if you want each marker to feel more charming.
Seal the rocks before placing them outside, because water, sun, and soil splashes can slowly dull the painted words over time.
Fence Welcome Signs
A cheerful sign can label the feeling of your garden before anyone even reaches the beds, especially near gates, fences, or entry corners.
Use stacked wooden arrows when you want the space to feel playful, personal, and more like a happy little garden destination.
Keep the wording short and bold, because decorative outdoor signs need to be readable before flowers, planters, and fence details take attention.
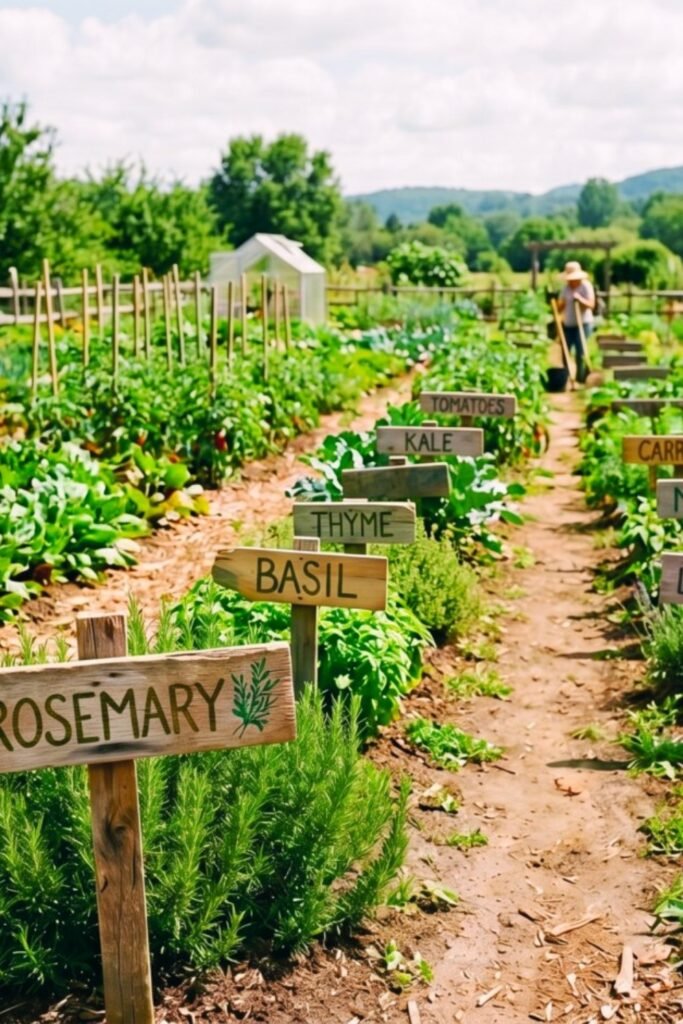
Large Row Signs
Big wooden row signs work best in wide gardens where tiny markers would disappear between tomatoes, herbs, kale, carrots, and walking paths.
Place each sign slightly above the plants, so you can read names from the path without stepping into the soil or bending down.
This style is perfect for vegetable gardens because it gives every row a clear identity while still keeping the whole space natural.
Story Path Signs
Fantasy-style signs make a garden corner feel imaginative, especially when you want labels that show personality instead of only plant names.
Use this idea near a tree, seating area, kids’ garden, or backyard reading nook where the sign adds charm and direction together.
Paint each arrow differently, then seal the wood well so the colors stay bright through sun, rain, and changing outdoor weather.
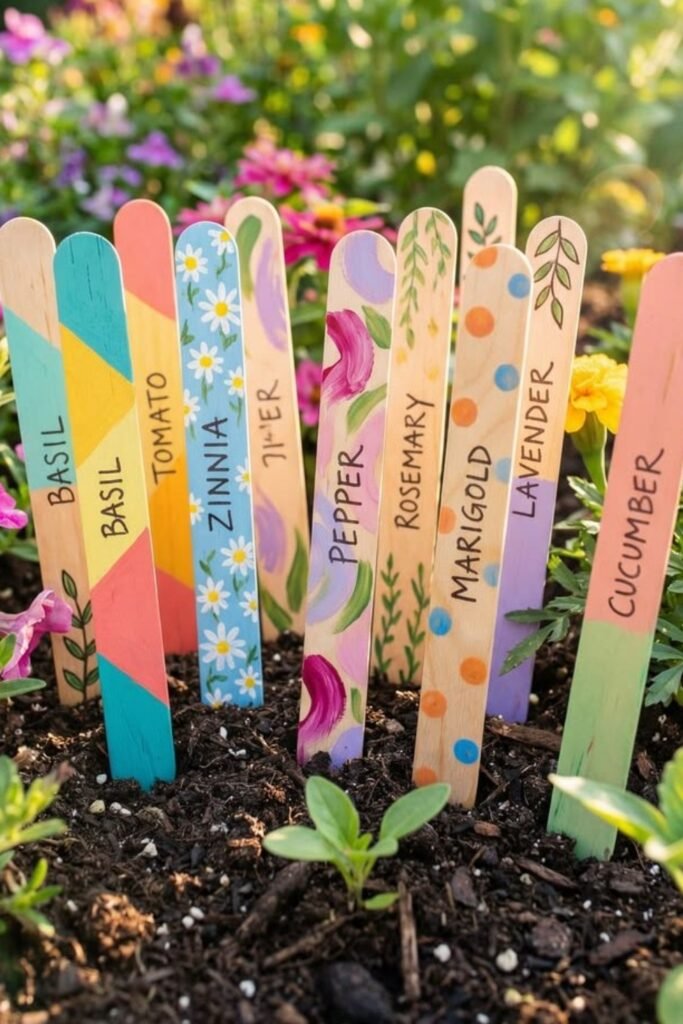
Painted Stick Labels
Painted craft sticks are a simple way to add color when plain plant markers feel too dull for a flower or herb bed.
Use different patterns for each plant name, especially if you want kids to help decorate labels before placing them in the soil.
These work best for short-term garden labeling, so seal them first if they need to handle rain, watering, and strong sunlight.
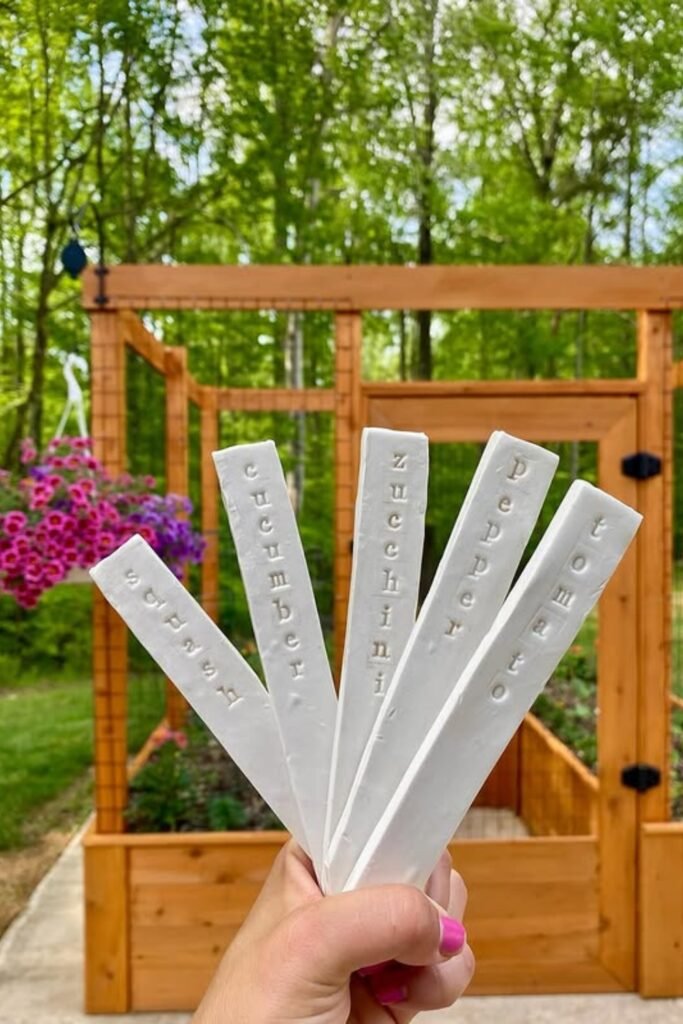
White Clay Stakes
White clay stakes give plant labels a clean handmade look while keeping the focus on the raised letters instead of bright decoration.
Stamp the herb or vegetable name before the clay dries, so the wording stays readable even if surface color fades later.
Use them in raised beds, herb gardens, or greenhouse planters where you want simple labels that feel neat, sturdy, and intentional.
FAQs
What can I use for DIY garden labels?
You can use many simple things you already have at home, such as popsicle sticks, smooth rocks, wooden scraps, plastic strips, old spoons, corks, clay, or broken terracotta pieces.
Use simple plastic or wooden tags for seed trays, but choose rocks, clay, metal, or sealed wood for outdoor beds where sun, rain, and watering can damage weaker labels.
How do I keep garden labels from fading?
Use a waterproof garden marker, outdoor paint pen, stamped letters, or engraved writing instead of a regular marker.
If you paint your labels, add a clear outdoor sealer before placing them in the garden. This step matters because sunlight, rain, and soil splashes can fade or blur the writing over time.
For long-term labels, stamped clay, painted rocks, metal tags, and sealed wood usually hold up better than plain craft sticks.

Hi, my name is Ali Mehmood! I’m a passionate writer and DIY enthusiast who loves turning creative ideas into practical, hands-on projects.
I created this website to share inspiring, budget-friendly ideas that you can do yourself – whether it’s organizing your home, crafting something unique, or creating fun projects for kids and pets.
I believe DIY isn’t just a hobby – it’s a smart way to save money, reduce waste, and enjoy the satisfaction of making things with your own hands.
I’m excited to have you as part of this growing community, and I’ll continue bringing you helpful, realistic, and fun DIY ideas you can actually use.


